
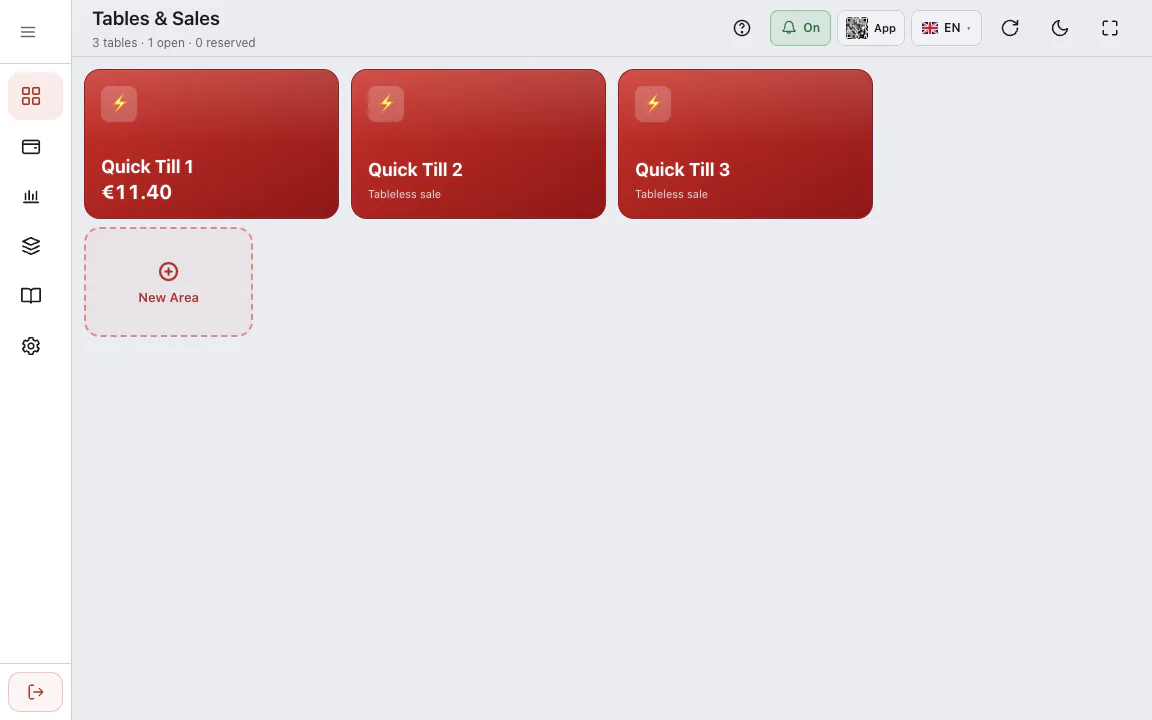
A coffee shop's till should not look like a restaurant's. In a self-service coffee shop the customer orders at the counter and pays first; in a restaurant the waiter serves the table and the bill closes at the end. A grocery store uses no tables at all and sells by barcode. In RoxPos this difference starts with the business type you choose at sign-up: the sales mode, the main screen, the sample products and the side menu are prepared for that type.
Choose the business type at sign-up
The Business Type list on the sign-up form has 20 types. When you pick one, its sales mode is shown underneath; for Grocery Store, for example, “Counter sales: Quick Till 1/2/3, fast barcode sales”. Each type belongs to one of three sales modes:
| Sales mode | Business types | Main screen |
|---|---|---|
| Counter sales | Coffee Shop, Bakery & Patisserie, Snack Bar & Kiosk, Canteen, Fast Food, Grocery Store, Delicatessen, Retail, Off-Licence & Tobacconist, Shop, Boutique, Rentals | Quick Till 1/2/3 (from 1 to 6); no table layout |
| Table service | Restaurant, Café, Bar & Nightclub, Beach Club & Water Park, Boutique Hotel, Other | Dining room and table layout; one Quick Sale |
| Delivery | Delivery & Takeaway, Cloud Kitchen | Takeaway / Delivery tab; no tables |
Fast Food starts with counter sales but with the kitchen display switched on, so orders reach the screen of whoever prepares them.
The setup wizard at first sign-in
The first time you sign in to the web panel as the business owner or an administrator, the “How will you use RoxPos?” window opens. It takes a few short steps; if you press “Later”, it comes back at your next sign-in.
1. Confirm the type and sales mode
The first page shows the business type you chose at sign-up; correct it here if it is wrong. Then choose the sales mode: Counter sales, Table service or Delivery. With counter sales you also set how many quick tills you want: 3 by default, at least 1, at most 6.
2. Decide on the sample products
If “Load sample products” is ticked, a sample menu that suits your type is set up: latte and croissant in a coffee shop, milk and barcoded shelf items in a grocery store, clothes with sizes and colours in a boutique, an hourly canoe in rentals. In the coffee shop, grocery, off-licence, shop and rental samples every product has an unbranded photo. Untick it and the samples are removed, so you start empty with your own products; if you have already added products, they are kept.
3. Answer a few questions
On the “How do you work?” page you get up to four yes / no questions for your type, such as: do you also serve at tables, do you take takeaway or phone orders, do you have your own couriers, do you take reservations, will you sell by barcode, will you track stock. The answers turn the related menus and settings on or off; for example, answering yes to “Do you have your own couriers?” turns on courier tracking and takeaway together.
4. Look through the getting-started guide
Once the screens are ready, the getting-started guide opens: up to 10 short pages picked for your type. Each page has a short animation with your own sample products and a one-sentence explanation, such as scanning barcodes and adding products in a grocery store, or table layout, QR menu and kitchen display in a restaurant. “Go to this page” opens the related screen and “Skip” closes the guide.
What does the side menu show?
Six menus are shown or hidden according to the business type: QR Menu, Staff, Kitchen Display, Reservations, Courier and Online Orders. A hidden menu only leaves the side menu; saved data is not deleted. The starting point by type is:
| Business type | Menus on at the start |
|---|---|
| Restaurant, Café, Other | QR Menu, Staff, Kitchen Display, Reservations, Online Orders |
| Bar & Nightclub, Beach Club & Water Park, Boutique Hotel | QR Menu, Staff, Kitchen Display, Reservations |
| Coffee Shop, Bakery & Patisserie, Snack Bar & Kiosk | QR Menu, Staff, Online Orders |
| Canteen | QR Menu, Staff |
| Fast Food, Delivery & Takeaway, Cloud Kitchen | QR Menu, Staff, Kitchen Display, Courier, Online Orders |
| Grocery Store, Delicatessen, Retail, Off-Licence & Tobacconist, Shop, Boutique | None |
| Rentals | Staff, Reservations |
Your answers in the wizard change this starting point. In a restaurant Courier starts off; it turns on if you answer yes to “Do you have your own couriers?”. In a grocery store, saying you will create staff accounts shows the Staff menu. The “Will you use a QR menu?” question only turns on the menu; ordering through the QR menu is switched on separately in the QR menu settings.
Changing it later
On the Settings ▸ Company Settings ▸ Business type & menus page you change the type, sales mode, number of quick tills, the questions and the six menus per branch. When the type changes, the menus suggested for that type are selected and applied when you save; “Reset to type defaults” takes you back to the suggestion. You can also switch each menu on or off regardless of the type; with counter sales the kitchen display appears on this page as Preparation Screen. Only the business owner or an administrator can change these settings.
- Switching to counter sales removes the table areas and creates the quick tills in the Other area. Occupied tables with open checks and their areas are kept.
- Switching to table service sets up sample areas if there are none; Quick Sale stays where it is.
- Switching to delivery removes the table areas and makes the Takeaway / Delivery tab the main screen.
- Products, sales and checks are not touched.
To watch the guide again, press “Show” on the Getting started card on the Help page, or “Show the guide again” on the same settings page. Opening the guide from Help changes no settings.
What changes for existing accounts?
Nothing. The wizard only opens for new accounts; in accounts opened earlier the menus and table layout stay as they are. If you want, you adjust your sales mode and menus yourself on the same settings page.
Counter sales are covered in detail on the barcode quick sale page, the steps from scanning to payment in the barcode selling guide, and the screens for each type on the industries page.